Ingredients
- 2 cups whole milk, 2% or skim milk (substitute with full-fat coconut milk for a dairy-free option)
- 1 cup granulated sugar (you can also use raw cane sugar or coconut sugar for a different flavor profile)
- ⅛ teaspoon baking soda (a pinch, optional but recommended)
- 2 tablespoons butter (optional, for a creamier texture; use dairy-free margarine for a vegan version)
- ½ teaspoon vanilla extract (optional, for added flavor)
Instructions
- Prepare the Milk Base: In a medium saucepan, combine 2 cups of whole milk and 1 cup of granulated sugar. Stir over medium heat until the sugar fully dissolves. Stirring consistently helps prevent burning and sticking. At this stage, the mixture should be thin and pale. Optional for Smoother Consistency: Add a tiny pinch of baking soda to stabilize the milk proteins, which reduces curdling and enhances smoothness. This may also add a subtle golden tone.
- For Dairy-Free Version: If using coconut milk, follow the same steps. Coconut milk provides a rich, tropical flavor that complements Caribbean-inspired desserts beautifully.
- Reduction Hack: Reduction Hack: Before you start, use a wooden spoon or other utensil to mark the starting level of milk in your saucepan. Dip the handle into the milk until it just touches the surface. Note where the milk reaches, and mark this level with a piece of tape, pencil, or by taking a mental note. Now, mark a second point halfway down the handle—this is your target. This quick trick allows you to check the milk’s reduction at a glance, helping you reach the ideal thick and creamy consistency.
- Simmer the Mixture: Once the sugar has dissolved, reduce heat to low and let the mixture simmer gently. Small bubbles should form around the edges as the color gradually deepens. Stir occasionally to prevent a skin from forming. Simmering Tip: This process takes about 35-40 minutes. Avoid increasing the heat to speed things up, as this can lead to curdling.
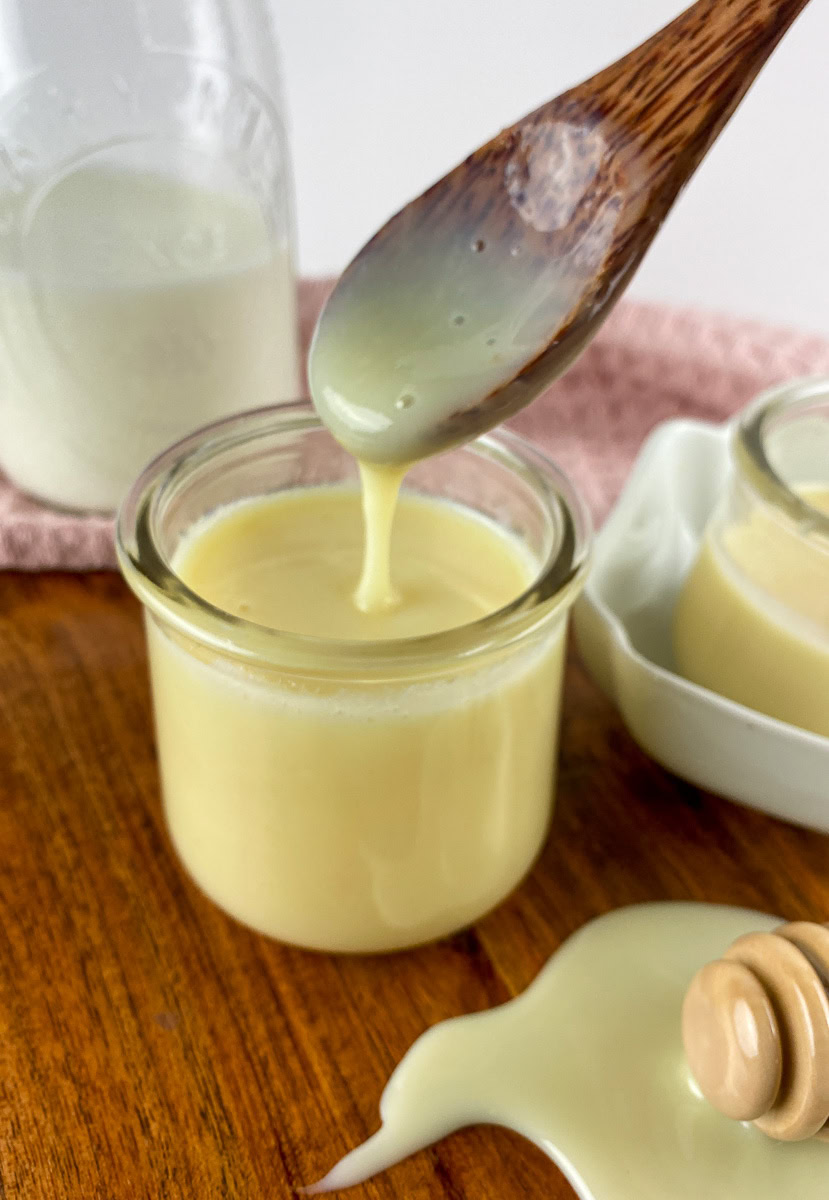
- Thicken the Sweetened Condensed Milk: After about 30-35 minutes, the mixture should reduce by half, turning a light golden color and achieving a syrupy consistency that coats the back of a spoon.
- Add Butter (Optional): For added creaminess, stir in the butter until fully melted and incorporated.
- Add Vanilla (Optional): Stir in the vanilla extract at the end for additional flavor.
- Strain for Extra Smoothness (Optional): If you notice any undissolved sugar or tiny particles, pour the warm condensed milk through a fine mesh strainer into a clean container. This will help ensure a smooth, creamy texture that’s ideal for desserts and drinks.
- Cool and Store: Remove from heat and let cool slightly before transferring to an airtight container. Storage Tip: The condensed milk will thicken as it cools. Refrigerate for up to 2 weeks.
- Freezing: For extended storage, pour the condensed milk into an ice cube tray to freeze in convenient portions. Once frozen, pop the cubes out and transfer them to a labeled freezer bag with the date marked on it. This method makes it easy to grab just the amount you need without defrosting the entire batch. Alternatively, if you’re using a different freezer-safe container, make sure to leave about 1/2 inch of space at the top to allow for expansion as it freezes. Thaw the desired portion in the fridge overnight and stir well before use to restore its creamy texture.
Keep your screen on while you cook.
I’m cookin’ with The Craven Foodie!Nutrition
Video
Notes
u003cliu003eu003cstrongu003eAvoid scorching:u003c/strongu003e Always use a heavy-bottomed pot to ensure even heating and avoid burning the milk.u003c/liu003eu003cliu003eu003cstrongu003eStir frequently:u003c/strongu003e This helps prevent the milk from sticking to the bottom and ensures a smooth consistency.u003c/liu003eu003cliu003eu003cstrongu003ePatience is key:u003c/strongu003e Don’t rush the simmering process by turning up the heat. Takes time for the milk to reduce properly.u003c/liu003eu003cliu003eu003cstrongu003eBoiling instead of simmering:u003c/strongu003e This can cause the milk to curdle, ruining the texture.u003c/liu003eu003cliu003eu003cstrongu003eReduction Hacku003c/strongu003e: Reduction Hack: Before you start, use a wooden spoon or other utensil to mark the starting level of milk in your saucepan. Dip the handle into the milk until it just touches the surface. Note where the milk reaches, and mark this level with a piece of tape, pencil, or by taking a mental note. Now, mark a second point halfway down the handle—this is your target. This quick trick allows you to check the milk’s reduction at a glance, helping you reach the ideal thick and creamy consistency.u003c/liu003eu003cliu003eu003cstrongu003eFor an extra creamy texture,u003c/strongu003e you can add a pinch of baking soda to the milk and sugar mixture. Do this either before simmering or after it thickens. This helps to neutralize acidity, reducing the risk of curdling and enhancing the richness.u003c/liu003eu003cliu003eu003cstrongu003eStrain While Warm:u003c/strongu003e Straining while the milk is warm helps it pass easily through the mesh, ensuring a smoother result.u003c/liu003eu003cliu003eu003cbru003eu003cstrongu003eExtra Creaminess:u003c/strongu003e Use a cheesecloth over the mesh for additional filtration if you want a texture that’s even closer to store-bought varieties.u003c/liu003eu003cliu003eu003cstrongu003eNot stirring enough:u003c/strongu003e This can lead to a grainy finish, so keep that spoon moving!u003c/liu003eu003cliu003eu003cstrongu003eStoring while hot:u003c/strongu003e Ensure the milk cools completely before storing to avoid condensation affecting its shelf life.u003c/liu003eu003cliu003eu003cstrongu003eTexture check:u003c/strongu003e The condensed milk is ready when it coats the back of a spoon and doesn’t drip off immediately.u003c/liu003eu003cliu003eu003cstrongu003eRecipe Read-Through:u003c/strongu003e Take a few moments to read through the recipe from start to finish before beginning. This ensures you’re aware of each step and ingredient, helping you avoid surprises during the process. It’s also helpful to gather your ingredients and equipment beforehand for smooth and efficient cooking.u003c/liu003eu003cliu003eu003cstrongu003eMise en Place:u003c/strongu003e Proper preparation, also known as 'mise en place,' is the key to cooking success. Gather all your ingredients and tools before you start. This avoids forgetting key steps and allows you to focus entirely on the cooking process. This method saves time, reduces frustration, and ensures a better outcome.u003c/liu003eu003cliu003eu003cstrongu003eOven Calibration: u003c/strongu003eMake sure to calibrate your oven regularly to ensure your recipes turn out as expected. Oven temperatures can become inaccurate over time, affecting your cooking. Check your oven’s accuracy every few months for the best results.u003c/liu003eu003cliu003eu003cstrongu003eShop Ingredients u0026amp; Toolsu003c/strongu003e: To make grocery shopping easier, you can generate a shopping list of all the ingredients. This can be done with just one click. Use the button below the ingredients list to get everything you need through Instacart. You can also scroll down to see the handpicked tools and equipment links. These are perfect for ensuring you’re fully prepped for this recipe!u003c/liu003eu003cliu003eu003cstrongu003eHigh-Altitude Adjustments:u003c/strongu003e At higher altitudes, lower air pressure affects baking and cooking times. To adjust, slightly increase your oven temperature by 15-25°F and reduce baking times by a few minutes. You may need to decrease sugar. Also, reduce leavening agents like baking powder while adding a little extra liquid to prevent dryness. Check your recipe often to avoid overcooking. For more details on high-altitude adjustments, refer to this guide on u003ca href=u0022http://Colorado State University Extension - High Altitude Food Preparationu0022u003eHigh-Elevation Food Preparationu003c/au003e. You can also check u003ca href=u0022https://www.kingarthurbaking.com/learn/resources/high-altitude-bakingu0022u003eKing Arthur's high-altitude baking tipsu003c/au003e for expert advice.u003c/liu003e
