Ingredients
For the Red Velvet Dough
- 2 large eggs
- 2 large egg yolks
- ⅓ cup granulated sugar
- 6 tablespoons unsalted butter, melted and cooled to room temperature
- 2 teaspoons red food coloring
- 1 teaspoon pure vanilla extract
- 3 ¾ cups all-purpose flour, divided
- 2 tablespoons unsweetened cocoa powder
- 1 package active dry yeast (1/4 ounce, or 2 1/4 teaspoons)
- 1 teaspoon salt
- ¾ cup buttermilk (warm) ( I used the buttermilk powder)
- ¼ - ½ cup heavy cream (optional)
For the Filling
- ½ cup packed brown sugar (light or dark)
- ¼ cup granulated sugar
- 2 tablespoons cocoa powder
- 1 teaspoon ground cinnamon
- ⅛ teaspoon salt
- 2 tablespoons unsalted butter
For the Cream Cheese Glaze
- ¼ cup cream cheese softened
- 2 tablespoons butter (unsalted + melted)
- 4 tablespoons whole milk (room temperature)
- 1 tablespoon pure vanilla extract
- 2 cups powdered sugar (confectioners sugar)
Instructions
Mixing By Hand
- Prepare a large bowl by lightly spraying it with cooking spray or coating it with a neutral oil.
- In a separate bowl, combine eggs, egg yolks, sugar, butter, food coloring, vanilla extract, 2 cups of flour, cocoa powder, yeast, and salt using a wooden spoon or whisk. Stir until a wet and sticky dough forms.
- Turn the dough onto a floured surface and knead for 8-10 minutes. Use as little flour as possible to avoid making the dough tough.
- Place the kneaded dough in the prepared bowl, turn to coat, cover with plastic wrap, and let it rise for 1 hour or until doubled in size.
Mixing with a Stand Mixer
- Stir the ingredients together by hand or using the mixer’s paddle attachment until they are evenly moistened.
- Attach the dough hook and add the remaining 1 and 3/4 cups of flour.
- Knead the dough on low speed for 6 minutes. The dough should be soft, moist, and tacky, but not excessively sticky. If the dough is too wet, add more flour 1 tablespoon at a time, until the desired texture is achieved.
- Transfer the dough to the greased mixing bowl, turning it once to coat.
- Cover the top of the bowl with plastic wrap or a dry dish towel, while it rises or proofs. Make sure the towel is large enough to cover the entire bowl, and that it doesn’t touch the dough. This will help to keep the dough warm and prevent it from drying out.
- Place the bowl in a warm, draft-free location, and let the dough rise for 2-2 1/2 hour or until doubled in size. To test the dough, gently press with your finger. If the indentation remains, the dough has fully risen.
Preparing the Filling
- While the dough is rising, make the filling by mixing together the brown sugar, granulated sugar, cocoa powder, cinnamon, and salt in a small bowl.
- Melt butter and set aside.
Shaping the Cinnamon Rolls
- Butter a 9×13-inch ceramic or glass baking dish.
- Roll the risen dough into an 18-inch by 12-inch rectangle on a lightly floured surface, with the longest side closest to you.
- Brush the dough with melted butter, then sprinkle the brown sugar-cocoa powder mixture over it. Leave a 1-inch border of plain dough without the cinnamon mixture along the edges of the dough. This will help prevent the mixture from spilling out during the rolling process.
- Starting with the long edge, tightly roll the dough into an 18-inch log.
- To cut the rolls, you can use a serrated knife or unwaxed floss. If using a knife, gently saw the log into 12, 1 1/2-inch wide pieces. If using floss, slide the floss under the roll and crisscross the ends, pulling through to cut the roll in half. Repeat to cut the rolls into 12 pieces.
- Place the rolls into the prepared baking dish, cover them with plastic wrap, and refrigerate overnight.
Baking the Cinnamon Rolls
- The next day, remove the rolls from the refrigerator and let them come to room temperature.
- Preheat the oven to 350 degrees F. Place a rack in the center of the oven.
- Bake the rolls until they are puffed and slightly darkened and the internal temperature reaches 190 degrees F, about 30 minutes. If the rolls are browning too quickly, simply place a piece of foil over the top of the pan to protect them.
- Remove the pan from the oven and place it on a wire rack to cool slightly.
Making the Glaze
- Making The Glaze
- In a mixing bowl, beat cream cheese until smooth.
- Add milk, and vanilla extract, and whisk until combined.
- Slowly mix in the sifted powdered sugar until smooth.
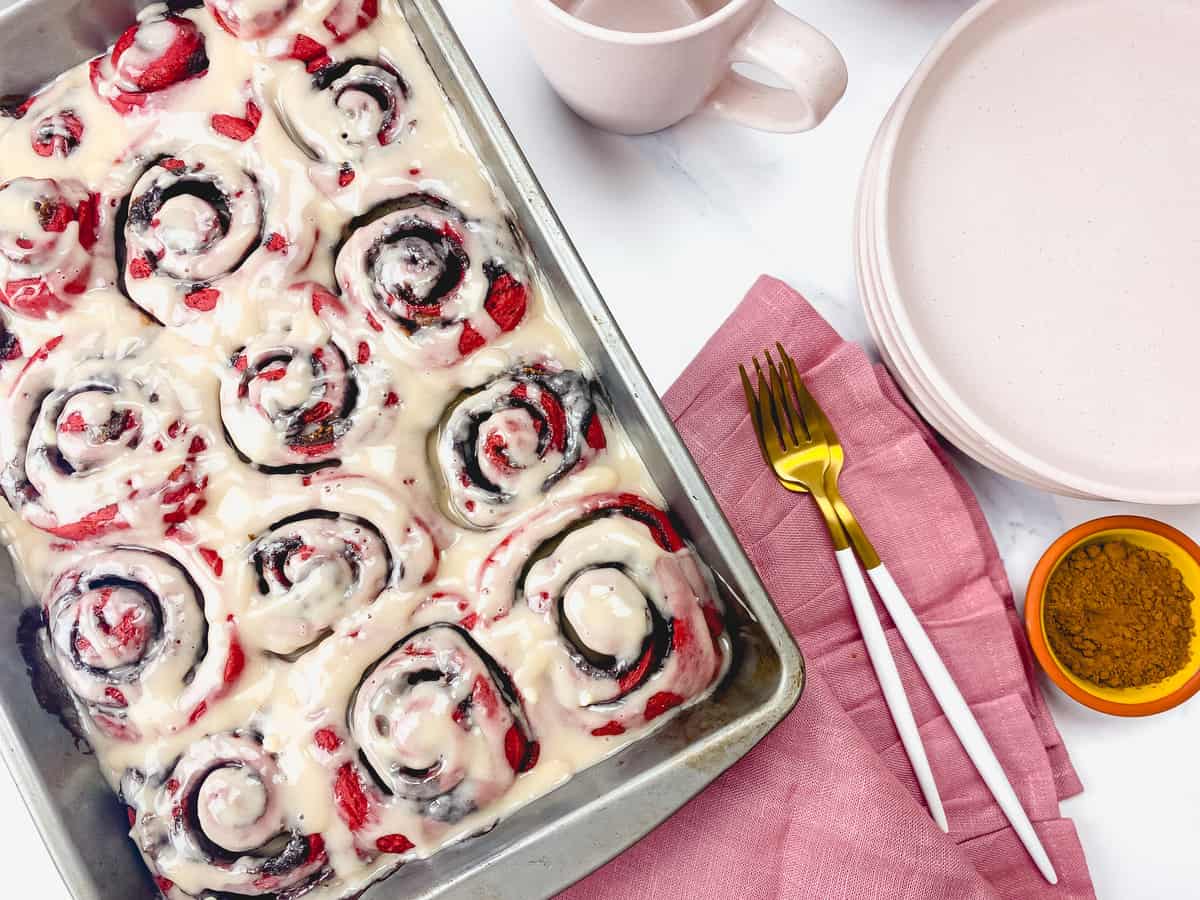
- Drizzle the glaze over warm rolls and serve immediately.
Keep your screen on while you cook.
I’m cookin’ with The Craven Foodie!Nutrition
Video
Notes
u003cliu003e For extra decadence, try incorporating the TikTok cinnamon rolls hack by pouring a generous amount of heavy cream over the top of the rolls before baking. The exact amount of heavy cream needed will depend on the size of your rolls but aim for a generous pour that fully covers the rolls. If you choose to add the heavy cream, bake the rolls as directed in the recipe. ***It's important to note that adding heavy cream to the rolls before baking will result in a moister, softer texture, and richer flavor, but it can also make the rolls more delicate and prone to falling apart. It's recommended to start with a small amount and gradually increase to your desired level.u003c/liu003eu003cliu003eu003cstrongu003eUse high-quality cocoa powderu003c/strongu003e – For a rich and intense flavor, use high-quality cocoa powder in the dough and filling.u003c/liu003eu003cliu003eu003cstrongu003eCheck the yeast's freshnessu003c/strongu003e - Before using your yeast, make sure to check its expiration date and if unsure, proof it to ensure it's alive and ready to use in your dough.u003c/liu003eu003cliu003eu003cstrongu003eWarm the buttermilk to the right temperature u003c/strongu003e– Make sure the buttermilk is warm but not hot, or it can kill the yeast and prevent the dough from rising.u003c/liu003eu003cliu003eu003cstrongu003eUse room temperature ingredients u003c/strongu003e– Make sure all ingredients, including eggs, are at room temperature before starting. This ensures that the dough rises evenly and forms a smooth texture.u003c/liu003eu003cliu003eu003cstrongu003eBe precise with measurementsu003c/strongu003e – When it comes to baking, precise measurements are key. Make sure you measure all ingredients accurately for the best results.u003c/liu003eu003cliu003eu003cstrongu003eFlour your work surface and rolling pinu003c/strongu003e: To ensure the dough doesn't stick to the surface or rolling pin, make sure to flour both thoroughly before rolling out the dough.u003c/liu003eu003cliu003eu003cstrongu003eUse a silicone rolling mat: u003c/strongu003eAnother option to prevent sticking is to use a silicone rolling mat. This not only makes it easier to roll out the dough but also ensures it doesn't stick to the surface.u003c/liu003eu003cliu003eu003cstrongu003eFor a neat and tidy dough u003c/strongu003e- Leave a 1-inch border of plain dough - without the cinnamon mixture along the edges of the dough. This will help prevent the mixture from spilling out during the rolling process.u003c/liu003eu003cliu003eu003cstrongu003eRoll with care - u003c/strongu003eWhen rolling the dough into a log, it is important to keep the roll tight and compact. Some bakers choose to spin the rolling pin gently as they roll to help ensure the dough stays tight and compact. This can help prevent any gaps or holes from forming in the roll, resulting in more evenly baked cinnamon rolls. However, be careful not to apply too much pressure or spin too vigorously, as this could cause the dough to become misshapen or break apart.u003c/liu003eu003cliu003eu003cstrongu003eChill the dough after rollingu003c/strongu003e – After rolling out the dough, chill it in the refrigerator for 15-20 minutes. This makes it easier to cut into rolls and ensures they hold their shape while baking.u003c/liu003eu003cliu003eu003cstrongu003eMake sure to fully incorporate the brown sugar into the butteru003c/strongu003e: Before spreading the softened butter on the dough, be sure to thoroughly rub the brown sugar into the butter to ensure even distribution and maximum flavor in every bite.u0022u003c/liu003eu003cliu003eu003cstrongu003eBrush the rolls with melted butteru003c/strongu003e – Before baking, brush the rolls with melted butter. This gives them a rich, golden color and a delicious buttery flavor.u003c/liu003eu003cliu003eu003cstrongu003eBake at the right temperature u003c/strongu003e– Bake the rolls in a preheated oven at 350°F. This ensures that they cook evenly and rise properly.u003c/liu003eu003cliu003eu003cstrongu003eLet the rolls cool completelyu003c/strongu003e – Before glazing, let the rolls cool completely. This prevents the glaze from melting and ensures it sets properly.u003c/liu003eu003cliu003eu003cstrongu003eMake the glaze ahead of time u003c/strongu003e– Make the cream cheese glaze ahead of time and keep it in the refrigerator until ready to use. This makes it easier to drizzle over the rolls and gives them a smooth, creamy texture.u003c/liu003eu003cliu003eIt is important to u003cstrongu003ecalibrate your oven regularlyu003c/strongu003e to ensure that your recipes turn out correctly. Ovens can drift from their set temperatures over time, so it is a good idea to check the calibration every few months.u003c/liu003eu003cliu003eu003cstrongu003eI highly recommend reading through the recipe in full a couple of times before starting to ensure that you know exactly what to expect and can prep accordingly. This can help to prevent any mistakes or surprises during the cooking process and will help you to achieve the best possible results. It's also a good idea to gather all of your ingredients and equipment beforehand to make the process as smooth and efficient as possible. u003c/strongu003eu003c/liu003eu003cliu003eu003cstrongu003eProper preparation, or u0022mise en place,u0022 is key to successful cooking. Gather all ingredients and have them measured and ready before cooking to avoid forgetting important items and focus on the cooking process. This technique can save time, prevent frustration, and improve the outcome of your recipe. Remember to use mise en place to prepare all ingredients before cooking.u003c/strongu003eu003c/liu003eu003cliu003eu003cstrongu003eTo make grocery shopping and recipe-saving easier, you can generate a shopping list of all the ingredients and save the recipe with a single click. (scroll ↓)u003c/strongu003eu003c/liu003e
